
[Customize it for easier use!] How to add more holes to the adjustment straps of a leather backpack
Hello!
This is Nakajima from HushTug.
In my previous blog, I introduced how to attach bottom studs to a business bag and wrote about how to customize existing products.
Continuing from last time, I would like to write about customizing existing products.
The product we will be customizing this time is a leather backpack , and we will show you how to add more holes to the adjustment strap and how to cut off excess adjustment strap.
It's a little long, but if you're interested, please give it a try.
Things to prepare before customizing the adjustment belt
Here are the tools you'll need to customize the adjustment parts of your leather backpack. 
1. Diamond punch <br>A diamond punch for leather craft.
This is a tool used to make holes in leather when hand sewing.
→ Check out the diamond punch on Amazon
2. Hand sewing needles <br>Hand sewing needles for leather craft.
This is a hand sewing needle for leather and, unlike a sewing needle, the tip is slightly rounded.
→ Check out hand sewing needles on Amazon
3. Hole punch <br>This is a tool used to make new adjustment holes in the adjustment belt.
→ Check out hole punches on Amazon
4. Hammer <br>A hammer used to make holes with a hole punch.
The one in the photo has a rubber tip, but the force dissipates when you hit it, so we recommend using a wooden mallet or something similar.
→ Check out the mallet on Amazon
5. Rubber Sheet <br>This is a rubber sheet that you can place on your desk to prevent scratches when using a hole punch. It is used when using a hole punch.
→ Check out the rubber sheets on Amazon
6. Sewing kit
You will mainly need sewing needles, thread, and thread cutters when sewing the lining, so I recommend buying a set.
If you already have one for home use, use that.
→ Check out the sewing kit on Amazon
That's all you need.
There are quite a few things to purchase, but you can get everything for 4,000 to 5,000 yen.
Also, there are some things that were introduced in the last blog post on "Installing the bottom tacks". If you already have them, make sure to only get the ones you need.
Add more holes to the adjustment strap of your leather backpack
We will show you how to add more holes to the adjustment strap of a leather backpack, and how to cut off the excess leather that results from adding more holes.
1. Decide where to add adjustment holes 
The adjustment holes on leather backpacks are usually spaced 3cm apart, so this time we will add two more holes, also spaced 3cm apart.
*You can use a ballpoint pen to mark the hole.
It is not necessary to drill the holes at 3cm intervals, you can drill them at any interval you like.
2. Make holes with a hole punch
Once you have decided on the location of the holes, you can actually drill them.
This time we will be making a total of four holes, two on each side, so let's open them in order!
2-1. Decide the size of the hole

Hole punches come in a variety of sizes, but to make it look neat, we'll make the hole the same size as the one currently there.
Compare the sizes and choose something of the same size!
2-2. Use a hammer to make a hole

Once you have decided on the size of the hole, use a hammer to start drilling.
To avoid damaging the desk underneath, place a rubber sheet underneath and hit it with a hammer.

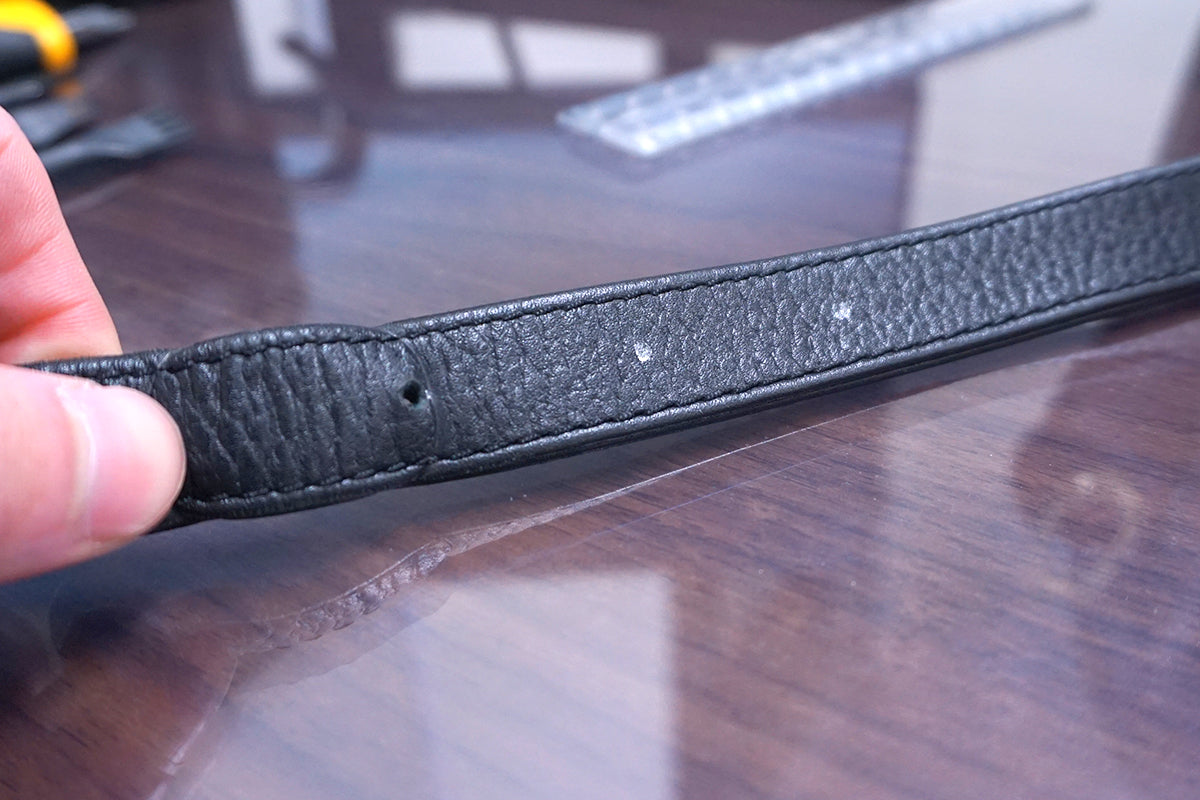
This will make a hole in the leather adjustment strap like this.
Now make holes at the remaining three marks, including the adjustment belt on the other side!
3. Check if it actually works

Once you have drilled the holes, make sure they actually fit into the adjustment brackets properly.
Since the holes were the same size, they went in without any problems.
If it is too small to fit, use a hole punch one size larger to make the hole again and adjust it to fit.
Cut off excess adjustment belt

Since we added two more holes to the adjustment belt, the excess length is now much longer.
The hole at the bottom was not originally used, so use the triangular piece of leather that is connected to the main body of the backpack as a guide to cut it.
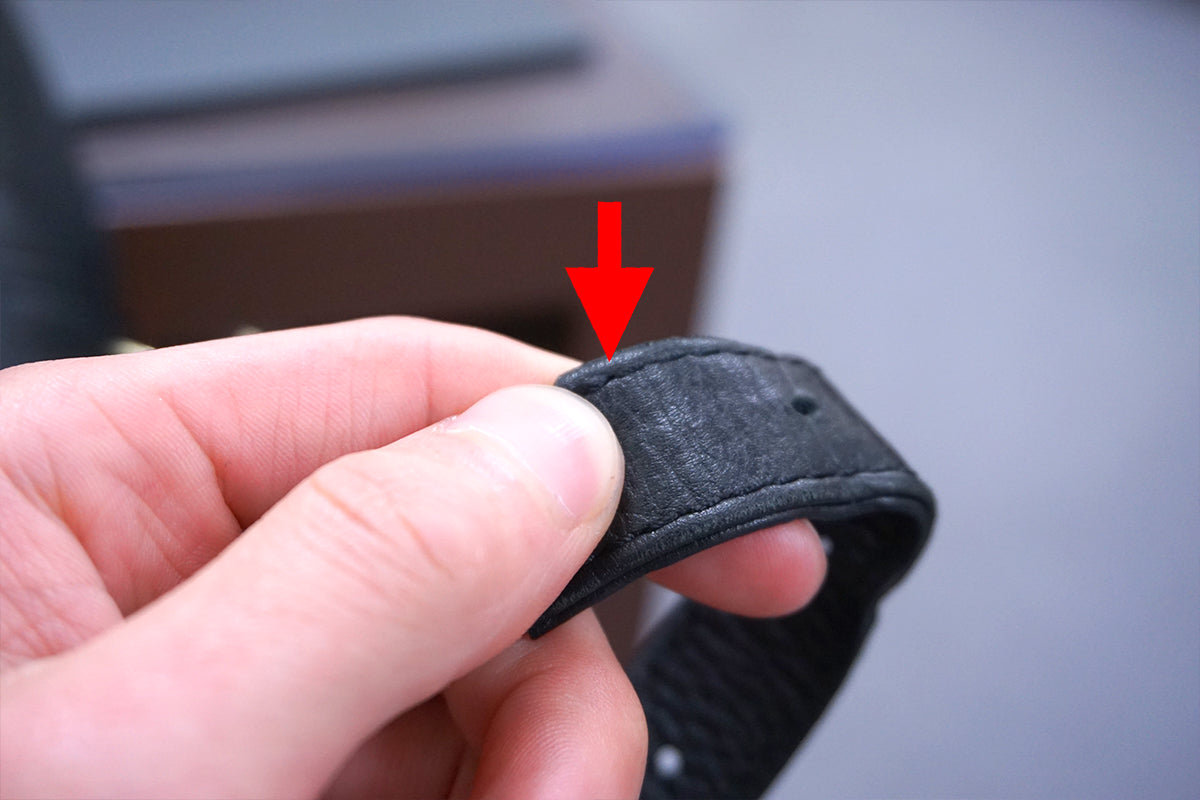
1. Mark the place to cut

Use the triangle of leather as a guide to mark the areas to be cut.
If you cut above the adjustment hole, the cross section will be uneven, so it is a good idea to make a mark a little before the hole.
2. Untie the thread to the marked position.

After marking where to cut, cut and undo the thread at the end of the adjustment belt.
You only need to untie the upper thread. The unraveled thread will be used for sewing, so we recommend leaving it as long as possible.
3. Use a diamond punch to make sewing holes
Once you have unwound the thread up to the mark, use an awl to make sewing holes.
Diamond punches come with one, two, four, or six blades, and are used depending on the width of the leather and the number of holes to be drilled.
3-1. Decide where to drill the holes

Use a two-bladed punch to place the hole in the seam with one blade and determine where to punch the hole.
Do not make holes yet at this stage, just press lightly to leave a mark.
3-2. Select the appropriate number of blades and drill holes

Once you have decided where to make the diamond stitches, you can actually make the diamond stitches.
The width of the adjustment belt is exactly 5 stitches, but since the diamond punch I have does not have a 5-bladed one, I use one with 4 blades and one with 2 blades to punch the diamond in two steps.
First, use four punches to lightly press down on the area you have made, then align the blades of the punches with the area you have made and strike it with a hammer.

Once four holes have been drilled, align the two-bladed diamond punch into the last hole.
At this point, make sure that one hole is already drilled and only the second hole needs to be drilled before you hit it!

There should now be a total of five sewing holes.
Next, thread the holes and sew by hand.
4. Hand-stitch the seams together
Use an awl to make holes for the seams and then sew them by hand.
You won't need to buy any new threads because you will be sewing using the two threads you unwrapped earlier. Now, let's get started.
4-1. Sew alternately

When hand sewing, you will use two sewing needles and sew alternately, so attach a sewing needle to each of the upper thread and bobbin thread that you just unraveled.

After threading the sewing needle, pass the upper thread through the sewing hole made with the stitching punch.
Next, pass the bobbin thread through the hole where you passed the upper thread and you've finished sewing one stitch.
Repeat this process to thread the thread through the five holes made with the punch.
4-2. Sew an extra stitch
Once you have sewn up to 5 stitches, pass the thread through to the 6th stitch (which is already threaded) and connect the sewing thread.
It is fine to stop after sewing up to 6 stitches, but to prevent fraying, sew one extra stitch with the top thread only. Sew a total of 7 stitches with the top thread and 6 stitches with the bobbin thread, and make sure that two threads are visible on the back of the adjustment belt.
4-3. Finishing the thread

After sewing 7 stitches for the upper thread and 6 stitches for the bobbin thread, finish the thread.
Cut both threads together with scissors.
At that time, leave a little bit of thread, just like in the photo.
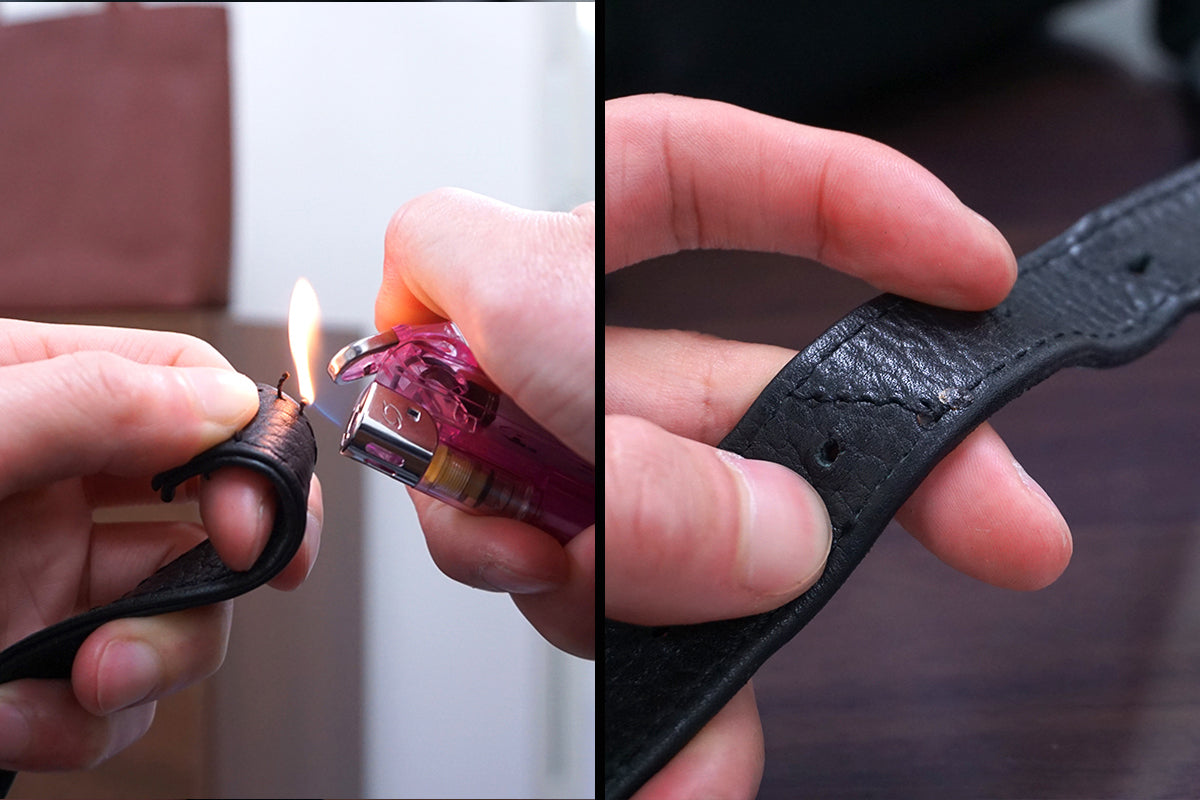
Unlike when sewing cloth, terminating the threads in leather products is done by burning the threads with a lighter.
The thread is melted and the holes are sealed with the melted thread.
5. Cut off the excess adjustment belt

Once the hand sewing is done, cut off the excess leather from the adjustment belt.
Cut about 2-3mm away from the seam, leaving yourself some room to spare.
This is to prevent the threads from fraying when the leather is cut if you cut too close to the seam.

Cut off the excess leather and do the same for the adjustment belt on the other side to finish.

If you want to make the cut edges of the leather less noticeable, try polishing the edges or painting them black with a pen to make the cut edges less noticeable.
Customization of the leather backpack's adjustment strap is complete.
What did you think?
This time, we introduced how to increase the number of holes in the adjustment straps of a leather backpack and how to cut off excess leather.
It's a little longer now, but it's not that difficult to shorten the belt, so if you want a snug fit, please give it a try!
Thank you for reading to the end this time as well.
HushTug Nakajima